
 While working in the environment of Visual Studio with Team Foundation Server (TFS) with multiple check out Disabled. you might come across a scenario where your team members have checked out a files and they are not present to check in for you to be able to use those files. This is why TFS has an administrative command prompt commands, this will only work if you have administrative access on the TFS project, and should not be done from the same computer that checked out the file.
Steps to force check out a file in TFS
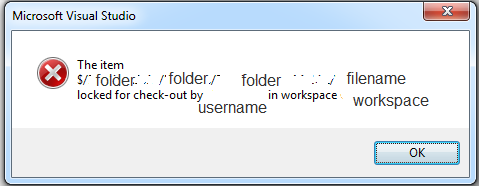
- Get the exact location of the file in the TFS , the username that has the file locked and the workstation from which this file is locked. This is a very simple step, try to check out the file an error message will appear giving you all this into
- Open the Command Prompt “CMD” to the following location C:\Program Files (x86)\Microsoft Visual Studio 10.0\Common7\IDE> (visual studio 10.0 depends on the visual studio version you have
- Run the following command tf undo /workspace:WORKSPACE;DOMAIN\USERNAME FullFilenameLocation (ex: tf undo /workspace:MYPC;Logicum\wissam $/Logicum/Logicum/Logicum.Web/Site.Master.cs)
- Remember the above step should be performed for all 3 files ( if asp page .asp, .asp.cs, designer.cs)
- You should receive the following success message in the CMD “The operation completed successfully. Because the workspace MYPC;wissam is not on this computer, you must perform a separate get operation in that workspace to update it with the changes that have been made on the server.” (message usualy in yellow)
Now the File is released and anyone can use it , also note that any changes done by the old user will be lost. this operation is an undo check out.
hope this helped, happy programming 🙂